



















Despite the difficulties brought by the cold, the winter season has a special beauty due to the landscapes created by the falling snow.













For many photography lovers, snow-covered landscapes create an extraordinary visual feast and increase the photographer's desire to shoot with their different atmosphere. However, taking snow photographs is a subject that has its own difficulties and requires attention to certain technical issues. Someone with general photography knowledge may not know more about snow photography than the sentence "plus exposure is necessary when shooting". He may even think that this information will be enough for him. However, I would like to clarify the issue by stating that the issue is not that simple. In order to stay in a certain order, I will discuss the subject in three parts…
Text: Dr. Kemal BEGENDİK ( Suretialem Photography and Cinema Art Association Vice President / Education Officer)
Photos: Dr. Kemal BEGENDİK – Pınar BEGENDİK
Details on Shooting Technique / Exposure
As I just mentioned, while getting general photography information, many photographers have heard that it is necessary to make "plus exposure" in snow photography. In general, the statement that +1 exposure will be made is one of the things you hear most. Now let's explain why and how much extra exposure is necessary.
As you know, all cameras have a sensor that measures the light level of the subject we photograph and guides us to adjust the camera settings accordingly. Photon-sensitive cells in the structure of this device, called POSOMETER or AE SENSOR, are charged with electrical energy and detect the light intensity of the environment. Since this load will be high in very bright environments and low in low light environments, it transmits basic information to the processor about how much light should be sent to the "image sensor" according to the energy level in the exposure meter. The equivalent of the light energy of the image passing through the lens (TTL = Through The Lens) that interests the photographer is the aperture (f value) and shutter speed (shutter speed). The camera processor calculates these two values taking into account the ISO speed we entered before and reflects them on the exposure compensation screen. We adjust the shutter speed and aperture values so that the exposure meter needle is below 0, according to our preference for clear depth of field or freezing motion. The two examples below show the exposure compensation dial on Canon and Nikon screens, and in the images the needle stops below 0.
,
However, in this system, since the exposure meter is calibrated on 18 percent gray, this calculation does not hold true in snow photographs. The equivalent of correct exposure in cameras is obtaining an 18 percent gray tone. In other words, if we set the exposure compensation needle below zero to photograph a black object, the camera will expose it to 18 percent gray. On the other hand, if we photograph a completely white object, it will still produce a brightness level of 18 percent gray tone. This issue is called exposure meter error . In this case, if we adjust a snowy area so that the exposure meter needle is below 0, the snowy areas will be exposed darker, being gray rather than white. Therefore, we compensate for this exposure loss by entering plus exposure , that is, by shooting brighter. (Note: Plus exposure results in brighter results, minus exposure results in darker results.)
In the two sample images below, you can see the position of the needle on the exposure compensation dial when plus exposure is entered.
So how much should this plus exposure be?
Of course, there is no fixed answer to this question that can be known in advance. As a general average, it is recommended to enter +1 exposure, but depending on the size of the snow-covered area, exposure compensation in the range of +0.5 to +2 may be required. If the snowy area covers the entire frame, the sky is brightly sunny and the snow is shining, it can be up to +2, while if there is a cloudy sky, buildings etc. If the amount of snowy area is reduced due to snow cover, +0.5 exposure may be sufficient.
Solutions for Situations That Mislead the Exposure Meter and Make It Difficult to Find the Correct Exposure
First of all, we need to pay attention to two issues in order for the exposure meter to detect the amount of light correctly:
- Choosing the correct measurement mode (metering mode) of the machine
- Measuring light from the right place on the subject
If we do not pay attention to these issues, we will get erroneous results. This image shows an incorrectly darkly exposed sample due to wrong metering mode selection and no exposure compensation.
Now let's consider these two issues in outline:
- Correctly entering the measurement mode of the machine: As you know, there are 3 basic measurement modes. These;
- spot
- Evaluative (Matrix=Matrix=General Area Measurement)
- They are Center Weighted Average modes. (Unlike others, Canon also has a partial metering mode, but it will not be discussed here. It is mostly preferred for portrait shots.)
If we are shooting general landscapes in snow photographs, it would be appropriate to use Evaluative Metering mode. Because in this mode, the camera divides the areas in the frame into 5 parts and makes separate exposure value readings for each (middle area, upper right, upper left, lower right and lower left areas). The camera decides which parts of the scene are important and should be exposed correctly. We normally implement this decision made by the machine by moving the needle to zero. However, in snow scenes, entering an exposure compensation between +1 and +2 depending on the brightness of the light will lead us to the correct result. My advice would be to shoot the same landscape separately with both +1 and +2 exposure compensation. (If you are familiar with your machine, you can do Exposure Bracketting.)
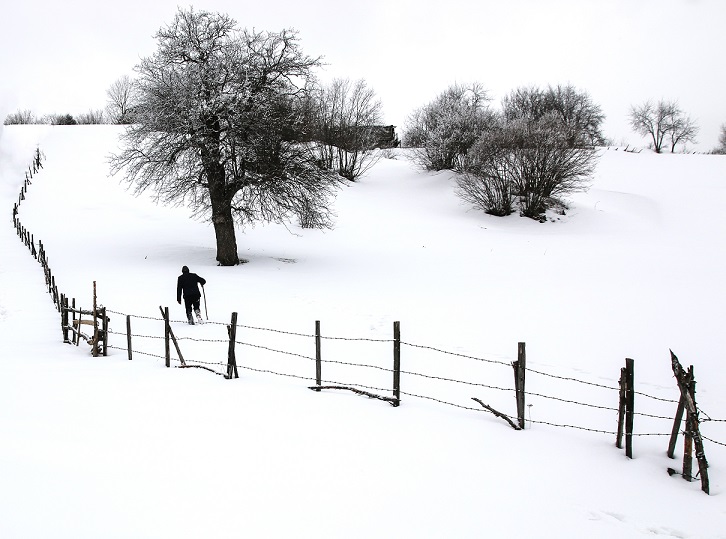
In the example photo, +1 exposure ensured that the model walking in the snow was correctly exposed and the snow appeared whiter and brighter.
If we had used spot metering mode in this photo, the camera would have measured from the image falling in a 1-3 percent area in the middle of the frame and directed us to correctly expose the bright white area consisting only of snow. Light measurement of such a bright spot cannot lead us to accurate conclusions about the light of this entire scene. So, shouldn't we use spot metering when photographing snow-covered landscapes? Of course our answer is no. Spot measurement leads us to the correct result, especially in portrait shooting in the snow. The important thing is where we measure the light in these photographs.
- Measuring the light from the right part of the subject: This issue, which is especially important in spot measurements, is suitable for portrait, macro etc. in snowy and bright environments. It will prevent us from making exposure errors when shooting subjects. First, let's interpret the sample photo and expand on the subject:
In this photo, our model is against a snowy background and is wearing a black hooded cardigan. In these color and light conditions, which are extremely adverse and challenging for the exposure meter, we can only achieve the correct exposure if we measure from the model's face. If we directly enter the values we took from the model's face without any additional exposure, we will get the correct result. Similarly, spot measurement from objects such as green leaves, tiles, or walls painted with mid-tone paint, on which the same light falls as the snowy areas, will lead us to the correct result for the entire landscape.
So, how should we proceed if our model is moving or far away and we cannot make spot measurements because of it?
The easiest solution to this is to measure the light of our hand in an environment where the light falling on the model is the same. The measurement we will make from the palm will be exactly the same as the settings required for correct exposure of the model. If I am shooting a model, I prefer to measure from my palm in a place with the same light, rather than from the model. Because factors such as beard, glasses and clothing may cause errors in spot measurement.
Details on Shooting Technique - White Balance:
One of the main problems in snow landscapes is that the white snow cover reflects the light falling on it in the same color. Under a blue sky, snow may appear blue, and towards sunset it may appear yellow-orange. Therefore, in order to achieve the correct color, it is necessary to take a photo of a white paper in ambient light, preferably with CUSTOM WB, and introduce it to the machine. In this way, the color tones that distort the white in the environment will be erased from the entire photo by the camera and a pure white color can be obtained. If you do not have the opportunity to do this, I recommend you shoot in RAW format to obtain better quality results in post-shooting editing. If you do not know RAW editing, your camera will partially correct chromatic aberrations if you shoot with AUTO WB. Pay attention to the blue tone reflected on the snow in the example photo. This tonal distortion could have been prevented if the correct white balance had been entered.
Composition Details:
Of course, when snow scenes are photographed with the right subject and content, they produce very beautiful and impressive results. However, if there are no contrast elements and details to fill the white space, our photo will remain monotonous and dull. Therefore, making sure that the white snow cover is not excessive in the photograph and that colorful and patterned elements are included will add liveliness and dynamism to the photograph. Elements such as tracks and fences that direct the eye's movement make the photo attractive.
Dried trees in winter create a different effect of sadness and gloom in the photograph. Frozen water, hanging ice, frozen plants, footprints on the snow are the elements that form and support the composition.
On the other hand, rather than shooting under the harsh sun, taking photographs at sunset, sunrise, called the golden hours, and in the late afternoon when the sun's rays fall close to horizontal, allows us to obtain very strong light and shadow elements on the snow.
Meanwhile, the dramatic effect that occurs during snowfall and foggy weather can enable us to take unique photographs.
With the tele lens and open aperture, snow on a blurred background can create a nice white background.
Details of Equipment and Photographer
In addition to the technical difficulties of taking photographs in winter, additional seasonal challenges require some precautions and preparations. Of course, first of all, the photographer must choose appropriate clothing for the environment, which will allow him to work comfortably in the shooting environment.
The basic hardware information you need to know in winter photography is that batteries appear dead even though they are charged around zero degrees. Therefore, a sufficient number of spare batteries should be available and they should be kept in a warm place (pocket, vehicle, etc.). If you warm up the battery that seems dead due to the cold, you will also see that some energy can be used again.
A bright sunny environment will make exposure difficult, especially when taking photos with blurry backgrounds (bokeh). The 1/4000 shutter speed that most cameras have will be insufficient at low aperture values in very sunny and snowy environments. Therefore, you may need to use a neutral density filter. In slightly hazy weather, it will be useful to use a polarization filter to capture the blue of the sky more clearly. You can also use a UV filter to protect the front lenses of your lens. If snowflakes stick to the windshield of your lens, it will be difficult to clean it, but you can easily clean the UV filter.
On the other hand, if you want to capture falling snowflakes clearly, using a flash that can also be used in Manual Mode will allow you to get more successful results. Flashes normally measure as TTL (that is, they automatically adjust the brightness level according to the light and distance information entering through the lens and measured by the exposure meter). You will get better results when used manually than with TTL. However, you will have to decide on this good result by trying it and depending on your taste.
Please Attention!
When you enter a warm environment with a camera and lens that has been in the cold for a long time, intense condensation occurs. This mist is sometimes so much that water droplets form and it occurs on the entire part of the machine. If you turn on the machine at this moment, there is a high probability that you will short circuit it. My advice is to remove the battery before entering from outside and do not turn on the machine until the condensation disappears. Never attempt to wipe off the resulting condensation on the optical surfaces and internal parts. Wait for it to disappear on its own. Of course, there is no harm in drying the outside of the machine.